DISABLE WINDOWS 10 UPDATE PERMANENTLY


Sometimes you’ve tried the solutions below to stop Windows 10 update, but it fails to work in times. one of the possible reasons is that Windows 10 Update Assistant modifies the settings in your computer and Windows 10 auto update starts to work again. So before proceeding you should check your system for Windows 10Update Assistant if it is not there you can directly skip to method 1 and If you have Windows 10 Update Assistant installed in your computer, you should follow below procedure.
Steps 1: Press the WindowsKey + R at the same time and type appwiz.cpl and click OK.
OR
Press Window Key + I click of the Apps.
Steps 2: Find the Windows 10 Update Assistant in the listed programs then right click on it, then select Uninstall.
For Conformation.
Steps 3: Open File Explorer, and click This PC.
Steps 4: If the Windows Update Assistant is installed by default when you install your Windows OS, go to the file where your system is installed, normally it’s
This PC > C drive > Windows > Windows10Upgrade,
then delete the Windows10Upgrade folder.
If the Windows 10 Update Assistant is installed separately, you can go to the location where the Windows 10 Update Assistant is saved, and delete the installation folder. It’s normally named as Windows10Upgrade.
Steps 5: Go to This PC > Windows, delete the folders named UpdateAssistantV2 and UpdateAssistant.
After the full uninstallation of Windows 10 Update Assistant, restart your computer.
Then you can try the methods below to stop Windows 10 update and it should work.
Note: if you don’t want to uninstall Windows 10 Update Assistant, you can disable it from Task Scheduler. Go to Task Scheduler >Task Scheduler Library > Microsoft > Windows > UpdateOrchestrator, then click Update Assistant in the right pane. Make sure to disable each trigger in Triggers tab.
Method 1: Disable Windows Update Service
Understand the limitations of this method. While disabling the automatic update service will temporarily halt any Windows 10 cumulative updates, the service will re-enable itself after a certain amount of time.
Steps 1: Press the WindowsKey + R to open command Box.
Steps 2: Type services.msc and press Enter.

Steps 3: Scroll down to Windows Update, and double-click it.

Steps 4: In Startup type, select "Disabled". Then click "Apply" and "OK" to save the settings.
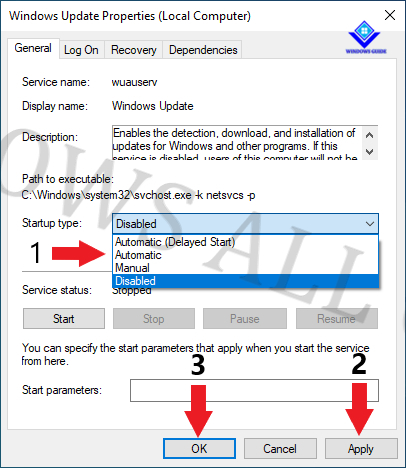
Steps 5: If it’s the first time that you stop the Windows Update service, you may also need to take one more step:
Still on the Windows Update Properties pane, click the Recovery tab, select Take No Action in the First failure section, then click Apply and OK to save the setting.

When you want to re-enable automatic updates you just follow the same procedure except you select “Automatic” when choosing the “Startup Type”.
Steps 6: Disable the Windows Update Medic & the Update Orchestrator Services through Registry.
Proceed and disable the following two Update services using registry:
i. Windows Update Medic Service (WaaSMedicSvc)
ii. Update Orchestrator Service (UsoSvc)
Steps 7: Press the WindowsKey + R to open run command box.
Steps 8: Type regedit and press Enter.

Steps : At the left pane, navigate to this key:
HKEY_LOCAL_MACHINE\SYSTEM\CurrentControlSet\Services\UsoSvc
Steps 9: At the right pane double-click at Start value.

Steps 10: Set the value data to 4 and click OK.

Steps 11: Then at the left pane, navigate to this key:
HKEY_LOCAL_MACHINE\SYSTEM\CurrentControlSet\Services\WaaSMedicSvc
Steps 12: At the right pane double-click at Start value.

Steps 13: Type 4 at Value data box and click OK.

Steps 14: Restart Your PC.
Steps 15: Now go to Settings > Update & Security > Windows Update.
You will receive the following error message whenever you try to download or install updates: "There were some problems installing updates, but we'll try again later. (0x80070437)" or, you'll see a blank window (without any options) or in my case "Something went wrong. Try to reopen setting later" its depend on the windows version.

METHOD 2. Disable updates using Group Policy
On
Windows 10 Pro and enterprises you can use the Local Group Policy
editor to disable automatic updates permanently, or you can change the
Windows Update settings to decide when updates should install.
To disable automatic updates, use these steps:
Steps 1: Press WindowKey + R.
Steps 2: Type gpedit.msc and press Enter Key this will open Group Policy Editor.

Steps 3: Navigate to the following path:
Computer Configuration\Administrative Templates\Windows Components\Windows Update
Steps 4: Double-click the Configure Automatic Updates policy on the right side.

Steps 5: Check the Disabled option to turn off the policy.
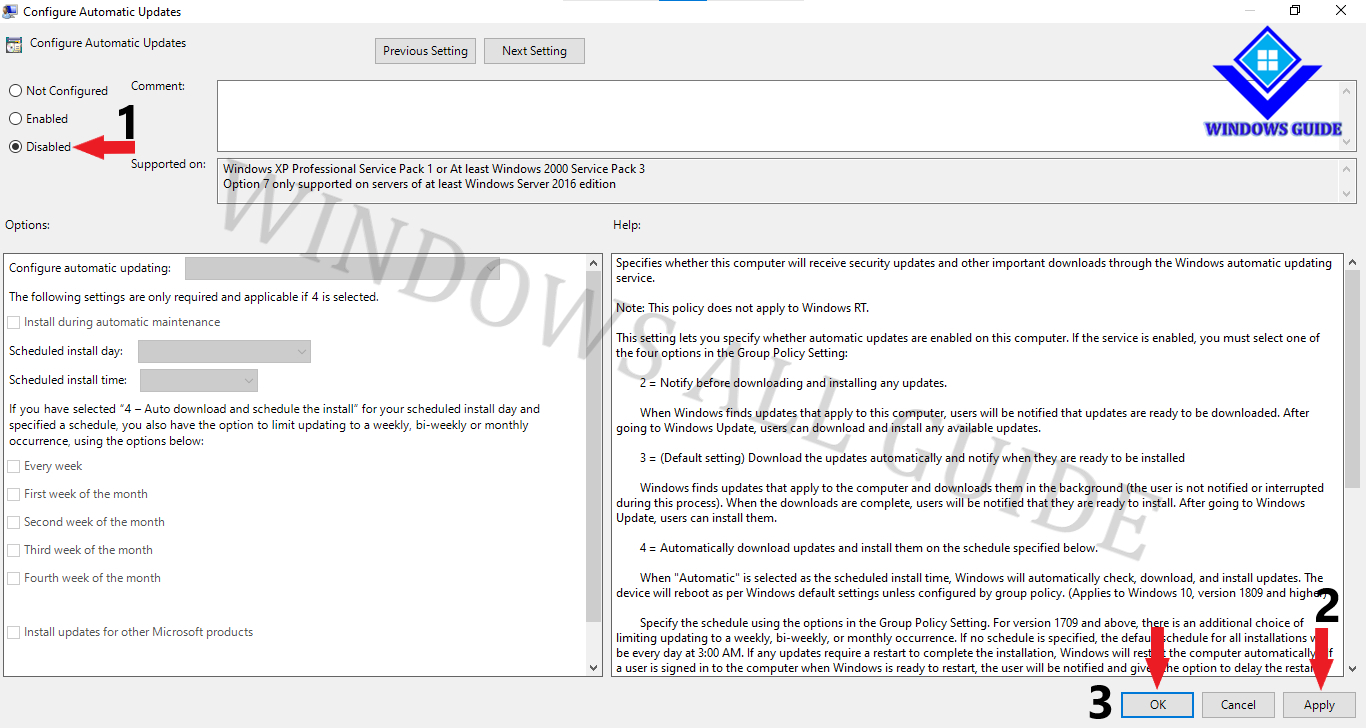
Steps 6: Click the Apply button.
Steps 7: Click the OK button.
Once you complete the steps, Windows 10 will stop downloading updates automatically.
While automatic updates remain disabled, you can still download and install patches manually from Settings > Update & Security > Windows Update, and clicking the Check for updates button.
Method 3. Turn on Metered Connection
For some reason, Microsoft only offers this option if you are using a WiFi connection. If you connect to the Internet through an Ethernet cable you will not be able to set up a metered connection.
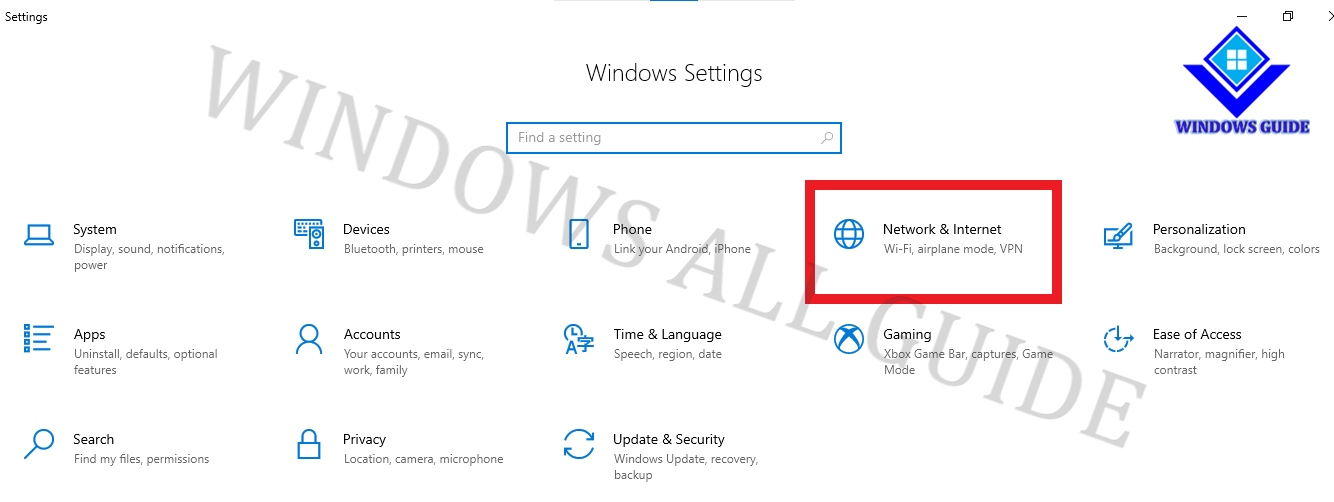
Steps 1: Click the Start button and then click the Settings app. OR Press Windowkey + I.
Steps 2: Click Network & Internet.
Steps 3: Open Wi-Fi and click the Manage known networks.

Steps 4: Select your network in my case its Realme and click on the Properties.

Steps 5: Scroll down to the Set as Metered Connection and Turn it ON.

Method 4. Disable with Software
StopWinUpdates is portable, but it acts and looks like an installer
which we found confusing. Double-click on the executable and choose your
options. By default, if you want to disable Windows Update, that's
checked by default. You will see prompts, again, that makes it appear
the program is installing, but it's just applying your changes. StopWinUpdates
will exit when completed and you'll want to reboot for the changes to
apply. If you change your mind, rerun the app and make any changes you
need and restart again. Additionally, there are registry hacks to block updates on Windows 7 and 8.1. Overall,
StopWinUpdates is another excellent app to disable or enable Windows
and Store Automatic Updates if you don't mind the installer style way
that StopWinUpdates works.
Steps 1: Run StopWinUpdate as Administrator.

Steps 2: Select the option you like and click Next.
Steps 3: After finish the disabling process click Finish to restart your PC.

THANK YOU
VIDEO TUTORIAL
VIDEO TUTORIAL


0 comments:
Post a Comment