There is
a way to change the system font in Windows 10, 7 or 8, but it isn't easy and
can be risky if not done correctly. But follow the steps here and you'll be
able to safely and easily get rid of Segoe UI and replace it with your favorite font.
Editing the Registry is risky, and it can cause
irreversible damage to your installation if you don't do it correctly. It's
recommended to make a temporary full backup of your PC before proceeding.
Alternatively, you can create a system restore point, which will also help you
to revert the changes.
SECTION-1
First, we'll back up your registry settings, so you can
reverse the changes in case you don't like them later. Then we'll simply update
the registry with a .reg file.
Steps 1.Press Win+R. Steps 2. Type in regedit and press Enter.
Steps 3. Go to File > Exportsave
as window appear.to save the registry file somewhere on your hard drive.
Steps 4. Select the location where you want save the
registry backup file and type the name and click save.
Note: Now if you want to restore the registry just open the registry
backup file which you have created.
SECTION-2 Steps 1. Open Notepad and copy and paste the following into it:
Replace Verdana in the last line with the name of the font
you want to use as your system default. To get the full and correct font name
Go to Control
Panel > Fontand open your font
and you will see the font name at top of the screen as shown in the screenshot
below.
Steps 2. Click File > Save.
Steps 3. Change the "Save as" type to "All Files."
Steps 4. In the File name field, give the file a.reg
extension. You can name it anything, as long as it ends in.reg.
Steps 5. Click Save.
Steps 6. Double-click the registry file you just created to
run it. You'll be prompted to allow the file to make changes to the computer
and confirm you want to continue, then get confirmation the changes were
successfully made.
Steps 7.Restart your computeror
log outto see the font change applied across Windows 10, 7 or 8.
Note: Just don't change the default font to something like Wingdings, lest you
render your system completely unreadable.
Here I am Uploading a Collection of Font. click on the below link to download.
The context menu (Right Mouse Button) should opens in an instant but some user facing problem with it. They experience delays of up to 5 seconds or more when clicking with the right mouse button. The problem is believed to be due to third-party elements introduced in modern versions of NVIDIA and Intel graphics drivers. There is a trick to solve the problem and we can solve the problem in Two ways. METHOD 1: Solving with Registry
In context Menu there are two option of Intel Graphic Driver we have to remove these two option from context menu and this will solve the problem. Similarly NVIDIA user also have this type of Graphic Driver option.
We can remove those element with the help of Regedit. Steps 1: Press Win Key + R then type regedit and click OK.
Steps 2: Navigate to HKEY_CLASSES_ROOT\Directory\Background\shellex\ContextMenuHandlers
Steps 3: Now delete the following Entries
For Intel graphics card, the two entries that we must remove are "igfxcui" and "igfxDTCM".
For NVIDIA graphics card the entry that we must delete is the one called "NvCplDesktopContext".
METHOD 2: Solving with Software
One of the reasons why the Windows context menu may take a long time to open is because we have many items in this menu. In that case, we can use ShellExView application to remove all those elements that we do not use/Want. Steps 1. Download ShellExView and extract it. Steps 2. Run shexview.exe to open program. .
Steps 3. In Program you can see a long list of option. We only want option that are present in context menu and for this we use filter. To filter Go menu "Options" and then choose "Filter By Extension Type".
Steps 4. Choose only "Context Menu" and press OK.
Steps 5. To disable an item, right click on it and choose "Disable selected items".
By default, Adobe Photoshop CC 2020 can be install only in windows 10 X64 and cannot support Windows 7. But there is a way to install Photoshop CC 2020 in Windows 7 X64.Just follow these Steps:
Note: I already downloaded the Photoshop CC 2020 v21.0.1.47 so I choose 3rd option. Steps 3. After Clicking on Install button a new window open. Steps 4. You have to search for the Driver.xml file of Photoshop CC 2020. Just go to folder where Your PhotoShop is saved and in Photoshop folder there are 3 folder you have to go in PRODUCTS folder and there you can find the Driver.xml file.
Steps 5. In next window there you have to select the feature, language and installation directory. just Click Install.
Steps 6. After Clicking Install next is conformation just click Install again and the installation process will Start.
Steps 7. At last a message appear that "The the following Applications were successfully install: Adobe Photoshop 2020 (win64)"
By default, Microsoft Office 2019 can be installed only on Windows 10 and can't be installed on other versions. But there is a way to install MS Office 2019 in other versions. Just follow these Steps:
Steps 2. Right Click on Office ISO File Hover the mouse over UltraISO and click on Mount to Drive I:(Where I is the Drive Leter of Virtual CD/DVD Drive letter)
Steps 3. Extract and open Wotok Offline as Administrator.
Steps 4. In Wotok There are Two section Office 2019 and Install Section.
Steps 4.1. In Office 2019 Section your Office Information will be shown and you don't need to do any things there.
Steps 4.2. In install Section you have to select the Component of office 2019 which you want to install.
Steps 5. Click on Install Office Button. This will start installing Office 2019.
Steps 6. After finishing the the installation a message appear "You're allset! Office is installed now" Just Click on Close Button.
Steps 7. Thats All you have Successfully Install Office 2019 in Windows 7 or 8.
Sometimes you’ve tried the solutions below to stop Windows 10 update, but it fails to work in times. one of the possible reasons is that Windows 10 Update Assistant modifies the settings in your computer and Windows 10 auto update starts to work again. So before proceeding you should check your system for Windows 10Update Assistant if it is not there you can directly skip to method 1 and If you have Windows 10 Update Assistant installed in your computer, you should follow below procedure.
Steps 1: Press the WindowsKey + R at the same time and type appwiz.cpl and click OK.
OR
Press Window Key + I click of the Apps.
Steps 2: Find the Windows 10 Update Assistant in the listed programs then right click on it, then select Uninstall.
For Conformation.
Steps 3: Open File Explorer, and click This PC.
Steps 4: If the Windows Update Assistant is installed by default when you install your Windows OS, go to the file where your system is installed, normally it’s
This PC > C drive > Windows > Windows10Upgrade,
then delete the Windows10Upgrade folder.
If the Windows 10 Update Assistant is installed separately, you can go to the location where the Windows 10 Update Assistant is saved, and delete the installation folder. It’s normally named as Windows10Upgrade.
Steps 5: Go to This PC > Windows, delete the folders named UpdateAssistantV2 and UpdateAssistant.
After the full uninstallation of Windows 10 Update Assistant, restart your computer.
Then you can try the methods below to stop Windows 10 update and it should work.
Note: if you don’t want to uninstall Windows 10 Update Assistant, you can disable it from Task Scheduler. Go to Task Scheduler >Task Scheduler Library > Microsoft > Windows > UpdateOrchestrator, then click Update Assistant in the right pane. Make sure to disable each trigger in Triggers tab.
Method 1: Disable Windows Update Service
Understand the limitations of this method. While disabling the automatic update service will temporarily halt any Windows 10 cumulative updates, the service will re-enable itself after a certain amount of time.
Steps 1: Press the WindowsKey + R to open command Box.
Steps 2: Type services.msc and press Enter.
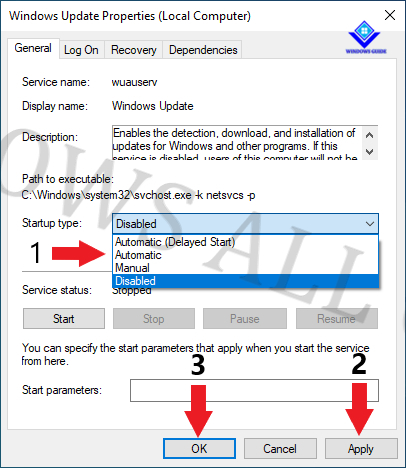
Steps 3: Scroll down to Windows Update, and double-click it.
Steps 4: In Startup type, select "Disabled". Then click "Apply" and "OK" to save the settings.
Steps 5: If it’s the first time that you stop the Windows Update service, you may also need to take one more step:
Still on the Windows Update Properties pane, click the Recovery tab, select Take No Action in the First failure section, then click Apply and OK to save the setting.
When you want to re-enable automatic updates you just follow the same procedure except you select “Automatic” when choosing the “Startup Type”.
Steps 6: Disable the Windows Update Medic & the Update Orchestrator Services through Registry.
Proceed and disable the following two Update services using registry:
i. Windows Update Medic Service (WaaSMedicSvc)
ii. Update Orchestrator Service (UsoSvc)
Steps 7: Press the WindowsKey + R to open run command box.
Steps 12: At the right pane double-click at Start value.
Steps 13: Type 4 at Value data box and click OK.
Steps 14: Restart Your PC.
Steps 15: Now go to Settings > Update & Security > Windows Update.
You will receive the following error message whenever you try to download or install updates: "There were some problems installing updates, but we'll try again later. (0x80070437)" or, you'll see a blank window (without any options) or in my case "Something went wrong. Try to reopen setting later" its depend on the windows version.
METHOD 2. Disable updates using Group Policy
On
Windows 10 Pro and enterprises you can use the Local Group Policy
editor to disable automatic updates permanently, or you can change the
Windows Update settings to decide when updates should install.
To disable automatic updates, use these steps:
Steps 1: Press WindowKey + R.
Steps 2: Type gpedit.msc and press Enter Key this will open Group Policy Editor.
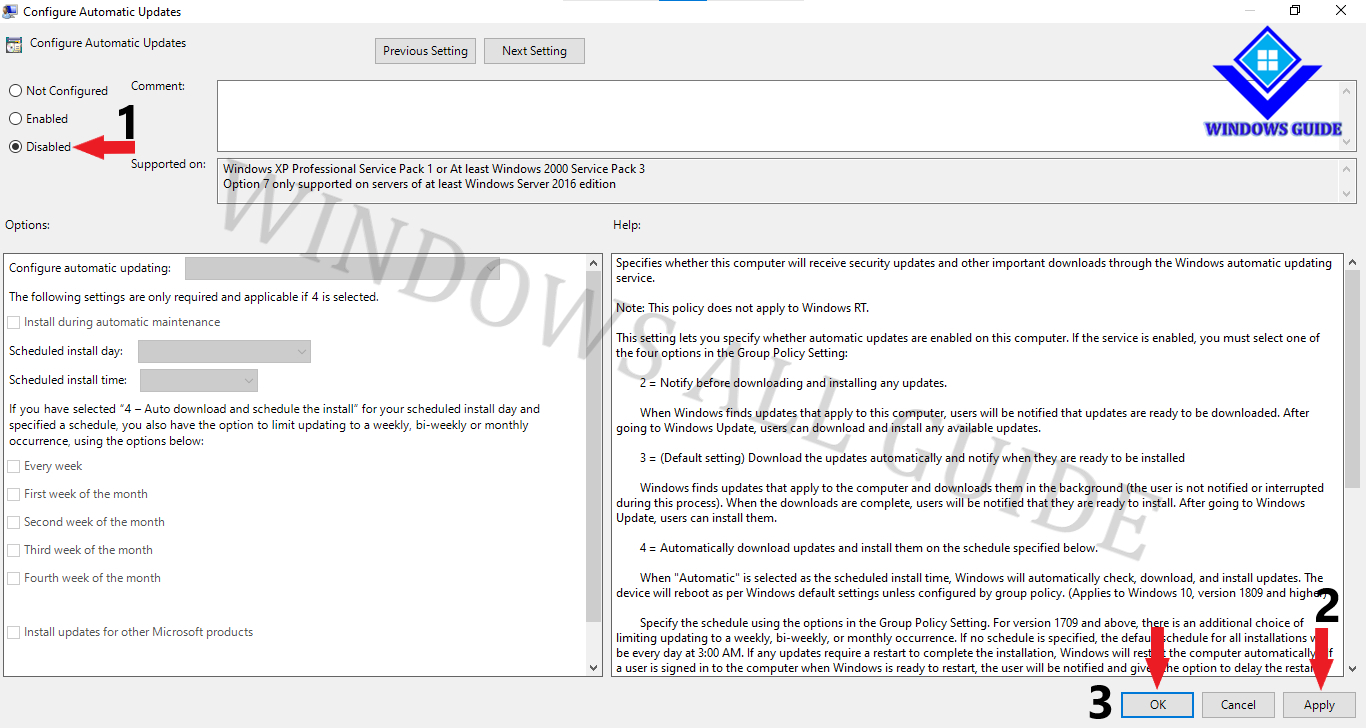
Steps 4: Double-click the Configure Automatic Updates policy on the right side.
Steps 5: Check the Disabled option to turn off the policy.
Steps 6: Click the Apply button.
Steps 7: Click the OK button.
Once you complete the steps, Windows 10 will stop downloading updates automatically.
While automatic updates remain disabled, you can still download and install patches manually from Settings > Update & Security > Windows Update, and clicking the Check for updates button.
Method 3. Turn on Metered Connection
For some reason, Microsoft only offers this option if you are using a WiFi connection. If you connect to the Internet through an Ethernet cable you will not be able to set up a metered connection.
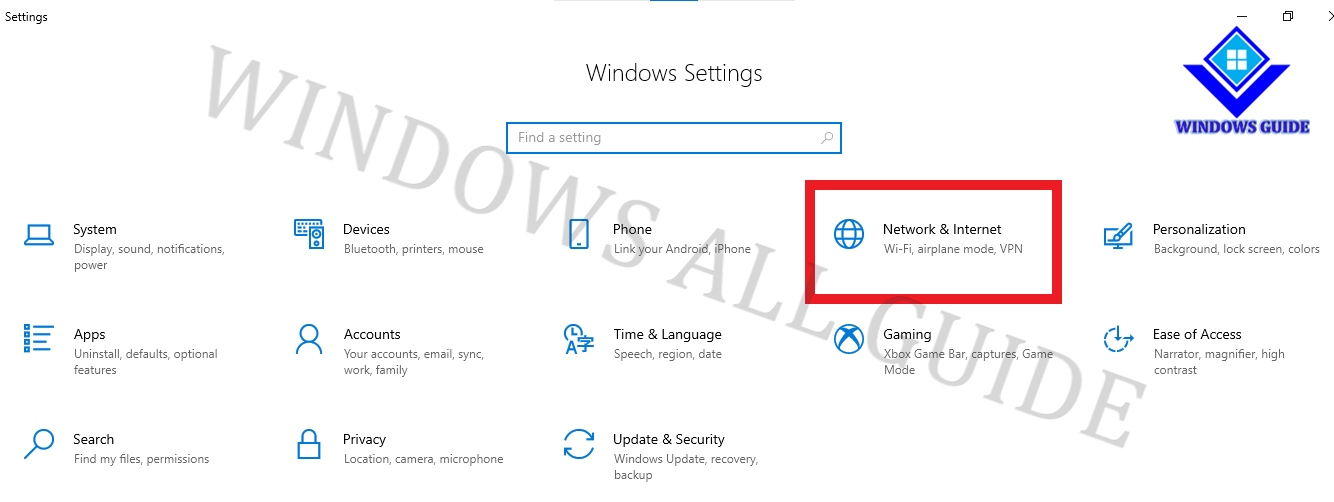
Steps 1: Click the Start button and then click the Settings app. OR Press Windowkey + I.
Steps 2: Click Network & Internet.
Steps 3: Open Wi-Fi and click the Manage known networks.
Steps 4: Select your network in my case its Realme and click on the Properties.
Steps 5: Scroll down to the Set as Metered Connection and Turn it ON.
Method 4. Disable with Software
StopWinUpdates is portable, but it acts and looks like an installer
which we found confusing. Double-click on the executable and choose your
options. By default, if you want to disable Windows Update, that's
checked by default. You will see prompts, again, that makes it appear
the program is installing, but it's just applying your changes. StopWinUpdates
will exit when completed and you'll want to reboot for the changes to
apply. If you change your mind, rerun the app and make any changes you
need and restart again. Additionally, there are registry hacks to block updates on Windows 7 and 8.1. Overall,
StopWinUpdates is another excellent app to disable or enable Windows
and Store Automatic Updates if you don't mind the installer style way
that StopWinUpdates works.